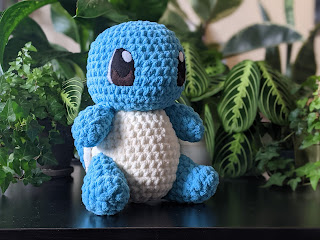
An update has finally come! I went through my pattern and remade it - I changed a couple things, but most work was just clarifying and correcting some errors.
These patterns take time to design and write out. If you enjoyed using my pattern, please consider supporting me by paying what you can for the pattern by using the "buy me a coffee" button to the right.
What You'll Need
Bernat blanket yarn in:
-Royal blue
-Vintage White
-Taupe
Scrap chunky white yarn (about 3 meters) (alternatively, use white bernat blanket yarn)
Brown, black, and white felt
Polyester stuffing
Glue Gun
Tapestry needle
Scissors
6.5mm crochet hook
Head and Body
(Using blue)
Round 1: SC 8 in magic loop (8)
Round 2: Inc x 8 (16)
Round 3: *Sc, inc* X 8 (24)
Round 4: *Sc 2, inc* X 8 (32)
Round 5: *Sc 7, inc* X 4 (36)
Rounds 6-9:Sc around for 4 rows
Round 10: Sc 16, inc, sc 2, inc, sc 16 (38)
Place markers over the two INC spots - that will be the front of the face
Round 11-13: Sc around for 3 rows
Round 14: Sc 4, Dec 16, sc 2 (22)
Round 15: Sc 4, Dec 8, sc 2 (14)
Continuing on to the body - stuff head
(using vintage white)
Round 16: Inc, SC, INC 6, sc, inc 5 (26)
Round 17: SC 6, inc, sc 4, inc, sc 7, inc, sc 4, inc, sc (30)
Round 18: *SC 9, INC* x 3 (33)
Round 19-28: Sc 10 rows
Round 29: SC, DEC around
Stuff body
Round 30-close: DEC to close
Shell
(Using Taupe)
Round 1: SC 8 in magic loop (8)
Round 2: Inc x 8 (16)
Round 3: *Inc 5, sc 3* X 2 (26)
Round 4: *Sc 2, inc* X 8, sc, inc (35)
Round 5: *SC 4, INC* x 7 (42)
Round 6: SC 3, inc, sc 9, inc, SC 10, INC, SC 9, INC, SC 7 (46)
Round 7: SC 4, hdc, dc 10, hdc, SC 11, hdc, dc 10, hdc, sc 7
(Switching to your white scrap yarn OR white bernat blanket yarn)
Round 8: Slip stitch around the outside, creating the white border. FO
*If you want a thicker border, SC around the outside instead of slst.
Tail
Round 1: Sc 8 into magic loop (8)
Round 2: Inc x 8 (16)
Round 3: *Sc 3, inc* X 4 (20)
Round 4-10: Sc around for 7 rows
Round 11: *Sc 8, Dec* X 2 (18)
Round 12: *Sc 7, Dec* x 2 (16)
Round 13: *Sc 6, Dec* x 2 (14)
Round 14: *Sc 5, Dec* x 2 (12)
Round 15: Sc around
Round 16-19: Sc 4 more rows
Round 20 to close: DEC to close, FO
Stuff tail lightly
I made the tail curl simply by folding over the top of the tail, and sewing that in place with extra yarn and the tapestry needle.
Arms
Round 1: SC 6 into magic loop (6)
Round 2: Inc 3, sc 3 (9)
Round 3: *Sc, inc* X 3, sc 3 (12)
Rounds 4-6: Sc around
Round 7: *Sc 2, Dec* X 3 (9)
FO
Stuff arms lightly
Legs
Round 1: CH 12 and join ends with slip stitch (12)
Round 2: *Sc 3, inc* X 3 (15)
Rounds 3-5: Sc around
Round 6: *Sc 3, Dec* X 3 (12)
Round 7: Inc 4, sc 8 (16)
Round 8: Sc 8, Dec 4 (12)
Round 9-close: Dec to close, FO
Stuff legs
Putting it Together:
- Sew on the shell. Use the markers on the face to make sure it's perfectly at the back. Leave about 4cm at the bottom unsewn - the tail will be sewn about 1cm under the shell.
- Sew on the tail - I like to put the shell over it a bit, which is why we've left that space.
- Sew on the arms and legs
Making the eyes:
I'm hoping to make a tutorial post about this sometime soon - maybe a video too.
- Cut the felt to shape. The main part of Squirtle's eyes is all black.
- Cut out the long white highlight, the round white highlight, and the brown lower highlight.
- I like to start a bit larger for all of these and slowly trim them down to size.
- Attach them using fabric glue/a hot glue gun OR you can hand stitch them all together one layer at a time.
- Attach the eyes to the face using glue or hand stitch them on. I like to pin them on first with sewing pins to get the perfect placement.
Have fun making him! If you have issues, feel free to ask in the comments and I'll get back to you asap (I'm trying to check in on them more often)
If you want to be reminded of when I post new patterns, subscribe to email updates on the right!


